Ryan's Brick BBQ Build

The Story: Food tastes better cooked over a fire. We had a neighbor who cooked us dinner many times in their brick BBQ, which was basically 3 sides of brick, open on the fourth side, standing on top of the ground. Moving provided me the perfect opportunity to build my own. I wanted something a little bigger and fancier. I had gotten a free pallet of brick and I had a warming burner and the rest of the parts from an old gas grill. I had even considered making the fire box with some gas tubes in it, for starting the wood and even for cooking if we wanted, but decided against it at the time due to complexity. Seeing how I've only done brick work once (a little wall of ~10 bricks), I knew this was obviously going to be a MUCH bigger project and I didn’t want to get in over my head any further than I already was.
The Start: I started with what we needed, a huge grilling area. With 9 kids and counting, we cook a LOT of food at a time. So I went to work surfing the Internet for the largest single-piece grill grate I could find, which happened to be a 28”x18” on eBay (my favorite place for treasure hunting). I then headed back to the Internet surfing thru pictures of outdoor BBQs to find a design I liked. Once found, I could model mine after it.
I then imagined the design my way, with my large grate, double wall fire box, a 2’x2’ counter top, a gas burner with a covered area for the propane tank, and some wood storage area. I wanted the fire box to stand out, so I made it stick out a little farther, and I also made it a little taller than the “countertop”. I didn't have any fire brick, so I figured the double wall would add strength and
Moving provided me the perfect opportunity to build my own. I wanted something a little bigger and fancier. I had gotten a free pallet of brick and I had a warming burner and the rest of the parts from an old gas grill. I had even considered making the fire box with some gas tubes in it, for starting the wood and even for cooking if we wanted, but decided against it at the time due to complexity. Seeing how I've only done brick work once (a little wall of ~10 bricks), I knew this was obviously going to be a MUCH bigger project and I didn’t want to get in over my head any further than I already was.
The Start: I started with what we needed, a huge grilling area. With 9 kids and counting, we cook a LOT of food at a time. So I went to work surfing the Internet for the largest single-piece grill grate I could find, which happened to be a 28”x18” on eBay (my favorite place for treasure hunting). I then headed back to the Internet surfing thru pictures of outdoor BBQs to find a design I liked. Once found, I could model mine after it.
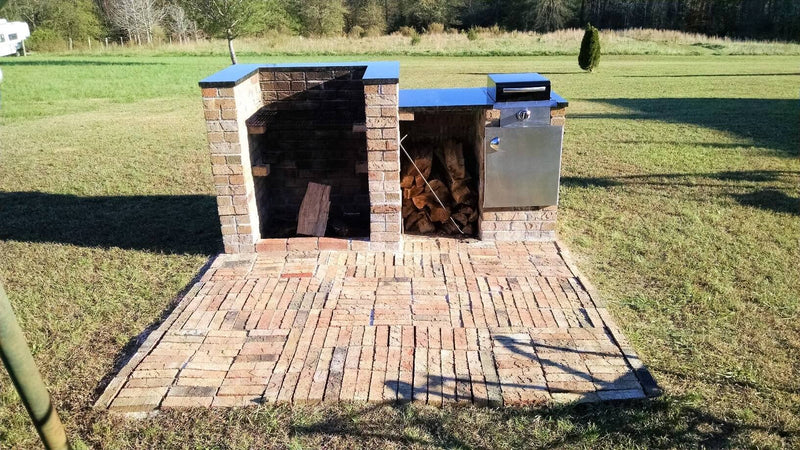
I then imagined the design my way, with my large grate, double wall fire box, a 2’x2’ counter top, a gas burner with a covered area for the propane tank, and some wood storage area. I wanted the fire box to stand out, so I made it stick out a little farther, and I also made it a little taller than the “countertop”. I didn't have any fire brick, so I figured the double wall would add strength and  insulation for cooking, as well as making it stand out. This would also help facilitate the bricks sticking out to hold the grate on one side (as seen in the picture on the left), and countertop on the other. I wanted to have a few levels so I could vary cooking methods depending on what and how I was cooking. As you can also see in the picture, I didn’t put one low enough, thus the reason the bricks are standing in the bottom. This will be corrected if I ever build another one. Wanting it easy to clean out, and not wanting rain puddling in the fire box, I left 2 full bricks out for openings in the bottom rear (also seen in picture), which also allows air to feed the fire.
I didn't really know what I wanted to do for the top surface, so I decided I would figure it out when the time came. For placement of our new outdoor BBQ area, I knew where I wanted it in the back yard, but we are also considering an in-ground pool in a few years. So along with keeping this project as cheap as possible, a cement patio was out of the question at this time. With all those free bricks, a floating brick patio seemed to be the logical choice. Hopefully I can move it onto a cement patio by a pool someday.
Let the Real Work Begin: This is really where I should’ve drawn up some plans, but for some reason I was determined to just build it on the fly. If anybody wants the plans, just email me and I’ll sketch it up for you quick.
insulation for cooking, as well as making it stand out. This would also help facilitate the bricks sticking out to hold the grate on one side (as seen in the picture on the left), and countertop on the other. I wanted to have a few levels so I could vary cooking methods depending on what and how I was cooking. As you can also see in the picture, I didn’t put one low enough, thus the reason the bricks are standing in the bottom. This will be corrected if I ever build another one. Wanting it easy to clean out, and not wanting rain puddling in the fire box, I left 2 full bricks out for openings in the bottom rear (also seen in picture), which also allows air to feed the fire.
I didn't really know what I wanted to do for the top surface, so I decided I would figure it out when the time came. For placement of our new outdoor BBQ area, I knew where I wanted it in the back yard, but we are also considering an in-ground pool in a few years. So along with keeping this project as cheap as possible, a cement patio was out of the question at this time. With all those free bricks, a floating brick patio seemed to be the logical choice. Hopefully I can move it onto a cement patio by a pool someday.
Let the Real Work Begin: This is really where I should’ve drawn up some plans, but for some reason I was determined to just build it on the fly. If anybody wants the plans, just email me and I’ll sketch it up for you quick. I had kids start carrying bricks over from where they have been stacked for a couple years to where the BBQ is being built.
I built the grill free-standing, with some gaps to represent mortar so I would have close to the final size. I started by laying all the brick out for the fire box, knowing the inside needed to be about 1” wider than my grate and a few inches deeper. I then worked my way over 2’ off the side wall to give me counter space and wood storage. Now it was time to fit the propane tank and the gas burner. I saw that it was good.
The next day I rested.
I now had the layout I wanted, so I set to work marking out and clearing a square 7'x7' area of grass, ensuring it was even from the house (and squared up by measuring corner to corner). I should've put down a sand base here, to keep the bricks even and level. This was not an area that I should've cheaped out on, but I did. Oh well, lesson learned for next time (if there is one).
Now We Really Start: Time to fill the patio in with bricks. The patterns you could do are endless, but I just started laying them in and rotated them a couple of times so there was some sort of pattern to them. Please remember that this was my first real masonry project – mortar is an art and takes lots of practice to be efficient!! As is mixing the mortar to the perfect consistency every time. Any mason will tell
I had kids start carrying bricks over from where they have been stacked for a couple years to where the BBQ is being built.
I built the grill free-standing, with some gaps to represent mortar so I would have close to the final size. I started by laying all the brick out for the fire box, knowing the inside needed to be about 1” wider than my grate and a few inches deeper. I then worked my way over 2’ off the side wall to give me counter space and wood storage. Now it was time to fit the propane tank and the gas burner. I saw that it was good.
The next day I rested.
I now had the layout I wanted, so I set to work marking out and clearing a square 7'x7' area of grass, ensuring it was even from the house (and squared up by measuring corner to corner). I should've put down a sand base here, to keep the bricks even and level. This was not an area that I should've cheaped out on, but I did. Oh well, lesson learned for next time (if there is one).
Now We Really Start: Time to fill the patio in with bricks. The patterns you could do are endless, but I just started laying them in and rotated them a couple of times so there was some sort of pattern to them. Please remember that this was my first real masonry project – mortar is an art and takes lots of practice to be efficient!! As is mixing the mortar to the perfect consistency every time. Any mason will tell  you the key to good results is the first couple layers of bricks, or so I've been told that's what they say. You do not want to skimp on taking you time here! I cannot emphasize that enough.
As you lay down first layer of mortar and set down the first layer of bricks, use your level and a long flat board repeatedly to make sure everything is flat and square exactly how you want it.
you the key to good results is the first couple layers of bricks, or so I've been told that's what they say. You do not want to skimp on taking you time here! I cannot emphasize that enough.
As you lay down first layer of mortar and set down the first layer of bricks, use your level and a long flat board repeatedly to make sure everything is flat and square exactly how you want it. I was taking bricks off the pre-built BBQ and laying them out on the patio, so I would have my pattern and directions still behind me as I built. I used a couple of small rods with a string to keep me going and then checked everything with a board and a level as I was working as well. But once you have the solid base you don't need the level as much and can use the string. I mostly used the level for front to back, and vertically up the sides. I was finding that one bag of mortar would do roughly 1 and 1/2 layers of bricks. And it would take me about 2 hours by the time I mixed up the mortar, laid the bricks, and cleaned up. One or two evenings a week I would try to get a layer done. On Saturdays, I would do 2-4 bags of mortar depending on how much time and energy I had.
During the build, I knew I was going to be putting in a door to cover the propane tank, so I went ahead and installed some plastic inserts in the mortar, as I hate drilling concrete. Be sure they are in a straight line if you do this. The most important thing, obviously, is that the tank fits in and out. There’s a small gap in the bricks on the bottom in the back so that any water that gets in can drain out. I also keep a small bucket of tinder in here for getting the fire started.
I was taking bricks off the pre-built BBQ and laying them out on the patio, so I would have my pattern and directions still behind me as I built. I used a couple of small rods with a string to keep me going and then checked everything with a board and a level as I was working as well. But once you have the solid base you don't need the level as much and can use the string. I mostly used the level for front to back, and vertically up the sides. I was finding that one bag of mortar would do roughly 1 and 1/2 layers of bricks. And it would take me about 2 hours by the time I mixed up the mortar, laid the bricks, and cleaned up. One or two evenings a week I would try to get a layer done. On Saturdays, I would do 2-4 bags of mortar depending on how much time and energy I had.
During the build, I knew I was going to be putting in a door to cover the propane tank, so I went ahead and installed some plastic inserts in the mortar, as I hate drilling concrete. Be sure they are in a straight line if you do this. The most important thing, obviously, is that the tank fits in and out. There’s a small gap in the bricks on the bottom in the back so that any water that gets in can drain out. I also keep a small bucket of tinder in here for getting the fire started.
 I started brooming sand into the patio to hold the bricks in place pretty early so that as I walked on them they’d move and get the sand down into them. It has worked really well, as I have done another bag or more over the last couple of years. It takes a lot of sand and time for it to get all settled in.
Topping it Off: I wanted the top look nice and be a good work surface. I considered a wood top (like a chopping block), making my own cement top, and granite. Wood was out almost immediately due to the upkeep required from sitting outside uncovered. I'd rather be cooking (well, eating really). The cement top seemed like it would be really heavy and another big project.
I was concerned about the cost of granite and installing it, since I had never done it before. I measured exactly what I wanted for pieces of granite. I added a 1/2” overhang everywhere except inside fire box. I sized them all as straight pieces for multiple reasons: ease of installation, possible differential heat expansion from brick (it is outside and may be used when below freezing temperatures outside), and in case of bricks shifting (in case I didn’t build it robust enough). The pieces would also be small enough for me to position and move around without being too heavy.
I sketched exactly what I needed, including which edges need to be finished and which didn’t. I then started contacting granite places around the area about getting scraps cut to my small sizes. As it turns out, they don't really have scraps like that. So, I had them quote the pieces that I wanted, and it turned out quite reasonable. 3M silicone would do the job of holding it in place, but still letting it move as the ground shifts and things heat and cool.
I started brooming sand into the patio to hold the bricks in place pretty early so that as I walked on them they’d move and get the sand down into them. It has worked really well, as I have done another bag or more over the last couple of years. It takes a lot of sand and time for it to get all settled in.
Topping it Off: I wanted the top look nice and be a good work surface. I considered a wood top (like a chopping block), making my own cement top, and granite. Wood was out almost immediately due to the upkeep required from sitting outside uncovered. I'd rather be cooking (well, eating really). The cement top seemed like it would be really heavy and another big project.
I was concerned about the cost of granite and installing it, since I had never done it before. I measured exactly what I wanted for pieces of granite. I added a 1/2” overhang everywhere except inside fire box. I sized them all as straight pieces for multiple reasons: ease of installation, possible differential heat expansion from brick (it is outside and may be used when below freezing temperatures outside), and in case of bricks shifting (in case I didn’t build it robust enough). The pieces would also be small enough for me to position and move around without being too heavy.
I sketched exactly what I needed, including which edges need to be finished and which didn’t. I then started contacting granite places around the area about getting scraps cut to my small sizes. As it turns out, they don't really have scraps like that. So, I had them quote the pieces that I wanted, and it turned out quite reasonable. 3M silicone would do the job of holding it in place, but still letting it move as the ground shifts and things heat and cool. As for the granite color, we decided we didn't want black when the salesman informed us how hot it would get in the sun. We decided on a dark green that had some deep crystals in it, really giving it a lot of depth in the sun. The salesman said the depth will grow over time, being outdoors in the sun, as long as I kept it polished up. While installing the granite, I installed the burner, followed by installing and tank and door.
Enjoying the Outdoor BBQ: The final cost was only a few hundred dollars, most of which was mortar. We enjoy meal after meal cooked over various woods, usually ending the evenings with s’mores and quiet time beside the fire. We have cooked, all at once, 16 pork chops and as many baked potatoes, with beans warming on the burner. So I'd say it is big enough for our large family.
To add to the look and functionality, we installed my great grandfather's old dinner bell (from the 1800s) next to it, which my father had just refinished. It is much better than yelling for the kids to come up from the creek for dinner.
Maintenance: This BBQ is ridiculously easy to keep clean. Follow up with a good polish, like Granite Gold Polish®. It gives an amazing depth and shine! It also makes future cleanups easier after application.
As for the granite color, we decided we didn't want black when the salesman informed us how hot it would get in the sun. We decided on a dark green that had some deep crystals in it, really giving it a lot of depth in the sun. The salesman said the depth will grow over time, being outdoors in the sun, as long as I kept it polished up. While installing the granite, I installed the burner, followed by installing and tank and door.
Enjoying the Outdoor BBQ: The final cost was only a few hundred dollars, most of which was mortar. We enjoy meal after meal cooked over various woods, usually ending the evenings with s’mores and quiet time beside the fire. We have cooked, all at once, 16 pork chops and as many baked potatoes, with beans warming on the burner. So I'd say it is big enough for our large family.
To add to the look and functionality, we installed my great grandfather's old dinner bell (from the 1800s) next to it, which my father had just refinished. It is much better than yelling for the kids to come up from the creek for dinner.
Maintenance: This BBQ is ridiculously easy to keep clean. Follow up with a good polish, like Granite Gold Polish®. It gives an amazing depth and shine! It also makes future cleanups easier after application. Tools
Tools
Moving provided me the perfect opportunity to build my own. I wanted something a little bigger and fancier. I had gotten a free pallet of brick and I had a warming burner and the rest of the parts from an old gas grill. I had even considered making the fire box with some gas tubes in it, for starting the wood and even for cooking if we wanted, but decided against it at the time due to complexity. Seeing how I've only done brick work once (a little wall of ~10 bricks), I knew this was obviously going to be a MUCH bigger project and I didn’t want to get in over my head any further than I already was.
The Start: I started with what we needed, a huge grilling area. With 9 kids and counting, we cook a LOT of food at a time. So I went to work surfing the Internet for the largest single-piece grill grate I could find, which happened to be a 28”x18” on eBay (my favorite place for treasure hunting). I then headed back to the Internet surfing thru pictures of outdoor BBQs to find a design I liked. Once found, I could model mine after it.
I then imagined the design my way, with my large grate, double wall fire box, a 2’x2’ counter top, a gas burner with a covered area for the propane tank, and some wood storage area. I wanted the fire box to stand out, so I made it stick out a little farther, and I also made it a little taller than the “countertop”. I didn't have any fire brick, so I figured the double wall would add strength and insulation for cooking, as well as making it stand out. This would also help facilitate the bricks sticking out to hold the grate on one side (as seen in the picture on the left), and countertop on the other. I wanted to have a few levels so I could vary cooking methods depending on what and how I was cooking. As you can also see in the picture, I didn’t put one low enough, thus the reason the bricks are standing in the bottom. This will be corrected if I ever build another one. Wanting it easy to clean out, and not wanting rain puddling in the fire box, I left 2 full bricks out for openings in the bottom rear (also seen in picture), which also allows air to feed the fire.
I didn't really know what I wanted to do for the top surface, so I decided I would figure it out when the time came. For placement of our new outdoor BBQ area, I knew where I wanted it in the back yard, but we are also considering an in-ground pool in a few years. So along with keeping this project as cheap as possible, a cement patio was out of the question at this time. With all those free bricks, a floating brick patio seemed to be the logical choice. Hopefully I can move it onto a cement patio by a pool someday.
Let the Real Work Begin: This is really where I should’ve drawn up some plans, but for some reason I was determined to just build it on the fly. If anybody wants the plans, just email me and I’ll sketch it up for you quick.
I had kids start carrying bricks over from where they have been stacked for a couple years to where the BBQ is being built.
I built the grill free-standing, with some gaps to represent mortar so I would have close to the final size. I started by laying all the brick out for the fire box, knowing the inside needed to be about 1” wider than my grate and a few inches deeper. I then worked my way over 2’ off the side wall to give me counter space and wood storage. Now it was time to fit the propane tank and the gas burner. I saw that it was good.
The next day I rested.
I now had the layout I wanted, so I set to work marking out and clearing a square 7'x7' area of grass, ensuring it was even from the house (and squared up by measuring corner to corner). I should've put down a sand base here, to keep the bricks even and level. This was not an area that I should've cheaped out on, but I did. Oh well, lesson learned for next time (if there is one).
Now We Really Start: Time to fill the patio in with bricks. The patterns you could do are endless, but I just started laying them in and rotated them a couple of times so there was some sort of pattern to them. Please remember that this was my first real masonry project – mortar is an art and takes lots of practice to be efficient!! As is mixing the mortar to the perfect consistency every time. Any mason will tell you the key to good results is the first couple layers of bricks, or so I've been told that's what they say. You do not want to skimp on taking you time here! I cannot emphasize that enough.
As you lay down first layer of mortar and set down the first layer of bricks, use your level and a long flat board repeatedly to make sure everything is flat and square exactly how you want it.
I was taking bricks off the pre-built BBQ and laying them out on the patio, so I would have my pattern and directions still behind me as I built. I used a couple of small rods with a string to keep me going and then checked everything with a board and a level as I was working as well. But once you have the solid base you don't need the level as much and can use the string. I mostly used the level for front to back, and vertically up the sides. I was finding that one bag of mortar would do roughly 1 and 1/2 layers of bricks. And it would take me about 2 hours by the time I mixed up the mortar, laid the bricks, and cleaned up. One or two evenings a week I would try to get a layer done. On Saturdays, I would do 2-4 bags of mortar depending on how much time and energy I had.
During the build, I knew I was going to be putting in a door to cover the propane tank, so I went ahead and installed some plastic inserts in the mortar, as I hate drilling concrete. Be sure they are in a straight line if you do this. The most important thing, obviously, is that the tank fits in and out. There’s a small gap in the bricks on the bottom in the back so that any water that gets in can drain out. I also keep a small bucket of tinder in here for getting the fire started.
I started brooming sand into the patio to hold the bricks in place pretty early so that as I walked on them they’d move and get the sand down into them. It has worked really well, as I have done another bag or more over the last couple of years. It takes a lot of sand and time for it to get all settled in.
Topping it Off: I wanted the top look nice and be a good work surface. I considered a wood top (like a chopping block), making my own cement top, and granite. Wood was out almost immediately due to the upkeep required from sitting outside uncovered. I'd rather be cooking (well, eating really). The cement top seemed like it would be really heavy and another big project.
I was concerned about the cost of granite and installing it, since I had never done it before. I measured exactly what I wanted for pieces of granite. I added a 1/2” overhang everywhere except inside fire box. I sized them all as straight pieces for multiple reasons: ease of installation, possible differential heat expansion from brick (it is outside and may be used when below freezing temperatures outside), and in case of bricks shifting (in case I didn’t build it robust enough). The pieces would also be small enough for me to position and move around without being too heavy.
I sketched exactly what I needed, including which edges need to be finished and which didn’t. I then started contacting granite places around the area about getting scraps cut to my small sizes. As it turns out, they don't really have scraps like that. So, I had them quote the pieces that I wanted, and it turned out quite reasonable. 3M silicone would do the job of holding it in place, but still letting it move as the ground shifts and things heat and cool.
As for the granite color, we decided we didn't want black when the salesman informed us how hot it would get in the sun. We decided on a dark green that had some deep crystals in it, really giving it a lot of depth in the sun. The salesman said the depth will grow over time, being outdoors in the sun, as long as I kept it polished up. While installing the granite, I installed the burner, followed by installing and tank and door.
Enjoying the Outdoor BBQ: The final cost was only a few hundred dollars, most of which was mortar. We enjoy meal after meal cooked over various woods, usually ending the evenings with s’mores and quiet time beside the fire. We have cooked, all at once, 16 pork chops and as many baked potatoes, with beans warming on the burner. So I'd say it is big enough for our large family.
To add to the look and functionality, we installed my great grandfather's old dinner bell (from the 1800s) next to it, which my father had just refinished. It is much better than yelling for the kids to come up from the creek for dinner.
Maintenance: This BBQ is ridiculously easy to keep clean. Follow up with a good polish, like Granite Gold Polish®. It gives an amazing depth and shine! It also makes future cleanups easier after application.
Tools
- Your favorite trowels (at least a pointed, edging, and square one)
- Shovel
- Wheelbarrow
- Small buckets (for mixing, rinsing, etc.)
- Tape measure
- Long level (at least 36")
- Long straight board, like a 2x4
- String and couple small rods
- An awning is also great help, but not required
- Lots of bricks
- Many bags of mortar
- A couple tubes of 3M silicone adhesive (rated for outdoor use) & LOTS of paper towels
- 3-4 bags children’s play sand
- Granite
- Lots of water
|
Posted on November 02 2017